More than just a residence, your home is also a refuge. It’s where you let down your hair, put up your feet, and find shelter from life’s storms. In the privacy, comfort, and security of your home, your yoga practice can blossom.
This article is geared toward helping you bring the teachings of yoga home, literally—right into your bedroom, kitchen, living room, and even bathroom.
It includes practices designed to turn housework into a moving meditation and to make brushing your teeth an opportunity to find balance.
These Yoga Sparks invite simple acts, such as getting up from a chair or picking up a laundry basket, to become opportunities to strengthen your legs and back.
There are breathing practices to calm your nervous system and help you sleep, and meditations that can transform everyday activities into sacred rituals.
Some of the practices are designed to help you organize and declutter your surroundings so your home can better support your physical, emotional, and energetic health. Play with these practices—and perhaps be inspired to create some of your own.
Yoga Poses for Good Posture
Rise and Shine
The way you start your day sets the tone for the rest of your waking hours. The common practice of jumping out of bed and rushing around is not only hard on your nervous system, but it also establishes a frantic, hurried tone that adds stress to your life.
Just getting out of bed can be stressful enough—particularly if it’s Monday morning, the time when heart attacks are most likely to occur (Watson 2009).
Start your day right by setting your alarm to go off at least five minutes before you need to rise so you can make the important transition from horizontal to vertical in a mindful, gradual manner.
If possible, choose a pleasant sound for your alarm—a favorite song or an appealing tone. If you have a “snooze” feature, use the second ring to let you know that you really must get out of bed.
When you wake—either from the alarm or on your own—invite your first conscious thought to be an expression of gratitude for the blessing of waking to a new day.
Then, when you’re ready, lie on your back, knees bent if you like or with your legs straight, and try this practice:
- Rest your palms on your belly below your navel and tune in to your breath. With eyes closed, mindfully breathe fully and deeply so that your hands rise as you inhale and fall as you exhale.
- Consider saying a prayer or setting an intention for your day, making a choice about how you want to move through the next twelve hours.
- Open your eyes and take a few more mindful breaths as you extend your arms overhead and stretch whatever body parts need attention.
- Roll onto your side, then use the strength of your arms to lift your torso as you lower your feet to the floor and come to a sitting position on the edge of your bed. Take a few easy breaths, then rise and greet your day with a smile.
Knee-to-Chest Pose
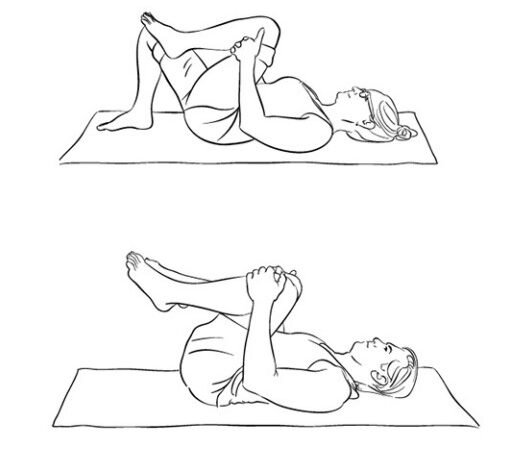

Waking up with an aching back is common in our culture, where back pain affects eight out of ten people at some point in life (National Institutes of Health 2012).
Arguably the single best backstretch is this knee-hugging posture. Try it first thing in the morning, before you get out of bed, or anytime you need to ease out your back.
- Lie on your back with knees bent and feet about hip-width apart.
- Take a full, easy breath in. As you exhale, hug your right knee to your chest, holding your leg behind your right thigh. (If this strains your shoulders, use a yoga strap, old necktie, or bathrobe belt to catch your leg.) Stay here for a few breaths, drawing your right thigh toward your body each time you exhale. Relax your shoulders, arms, and face, inviting your breath to help soften any tension you might feel.
- Release and repeat with the left leg.
- Variation 1: While hugging your knee to your chest, draw circles with the toes of the same foot to “wake up” your ankle.
- Variation 2: Hug both knees at the same time and rock gently from side to side.
Apanasana: Wind-Relieving Pose
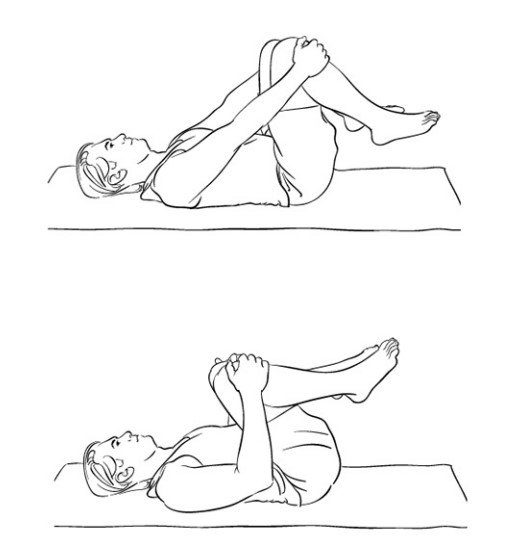

This simple posture can be profoundly helpful in both stretching out your back and relieving constipation, bloating, and other symptoms of digestive distress.
In yogic teachings, Apana, for which this posture is named, is the energy of elimination that governs the expulsion of wastes.
This pose is designed to enhance the flow of Apana—so don’t get embarrassed if it lives up to its name in “wind relief”! (If you’re pregnant, skip this pose).
- Lie on the floor or in bed with your knees bent and take a few easy breaths.
- Bring your thighs in toward your torso, with your hands resting on your knees. If this is uncomfortable, hold your legs behind your thighs or use a yoga strap to catch your legs.
- As you take a full, easy inhalation, straighten your arms and let your thighs move away from your body while continuing to lightly hold your knees.
- As you exhale, bend your elbows and draw your thighs back toward your body, bringing them as close as comfortably possible.
- Continue for five to ten breaths, synchronizing your movement with your breath to create a gentle pumping action.
- If you have a round body, feel free to open your thighs wider to make the pose more comfortable.
Standing Salutation


This practice is a small piece of the classic yoga sequence called the Sun Salutation, or Surya Namaskar, which moves the major muscles and joints of the body through a full range of motion.
Here, the focus is on energizing the arms, shoulders, and upper body. This practice is a lovely way to start the day or to take a break if you’ve been sitting still.
- Stand tall in Mountain Pose and turn your attention to your breath.
- On an inhalation, rotate your arms from the shoulders so your palms turn out and your shoulder blades move toward each other, simultaneously extending your arms out to the sides and up overhead until your palms touch, lifting your heart toward the sky and gazing up at your thumbs. Keep your neck long; don’t drop your head back.
- As you exhale, keep your palms together and bring your hands down past your forehead and throat, resting them at your heart center—a position called Anjali Mudra.
- Repeat five times, synchronizing your movement with your breath. On each inhalation, visualize yourself gathering in positive energy. On each exhalation, bring this energy into your heart.
Chair Pose
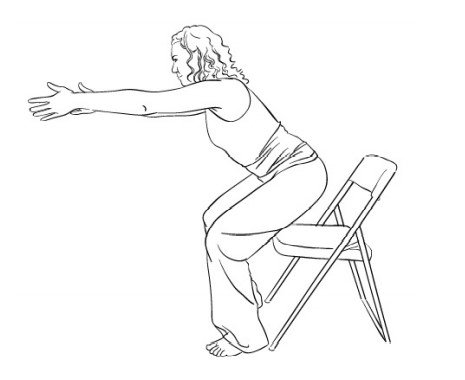

Most of us get up and down from sitting many times throughout the day. Chair Pose can turn each of these moments into an opportunity to build strength in the quadriceps, the muscles in front of the thigh.
Strong quads are a key determinant for an older adult’s ability to live independently, which is why they are sometimes called the “muscles of independence.”
In fact, the chair stand test for older adults counts how many times someone can come to standing in thirty seconds as a way to determine lower body strength and fall risk (Rikli and Jones 2001). Practicing Chair Pose can enhance strength and balance.
- Sit toward the front of a chair with both feet planted firmly on the floor.
- Take an easy, full breath in, then exhale as you hinge forward from your hips, keeping length in your spine (not rounding your back). At the same time, press your feet into the floor and use the strength of your legs to come to a standing position.
- Standing in front of the chair, inhale as you extend your arms forward to shoulder height, bend your knees, and hinge forward from your hips—not your waist. At the same time, stick your bottom out and, keeping length in your spine (not rounding your back), lower yourself slowly and mindfully into the chair.
- Repeat five to ten times, coming to a standing position, then slowly lower yourself back to a sitting position. Be sure to keep your breath flowing; don’t hold your breath.
- Variation: For more challenge, as you return to the seated position from standing, hover with your bottom a few inches from the seat for several breaths before sitting.
Hip Hinge: Lift and Carry
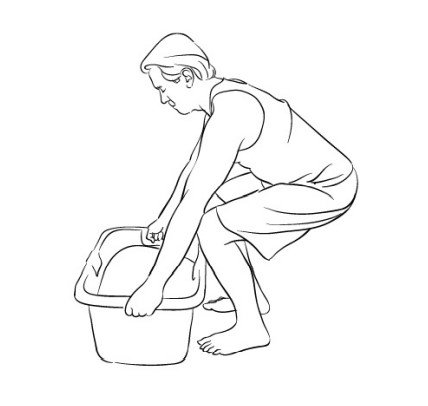

When people hurt their backs, it’s often from doing something relatively minor, such as picking up the newspaper from the floor.
Poor body mechanics can increase the risk of injuring your back and can also increase the risk of a vertebral fracture in those with osteoporosis.
Bending forward can be a particularly problematic movement, which is why the National Osteoporosis Foundation recommends that people with impaired bone strength avoid bending forward from the waist (National Osteoporosis Foundation 2011).
Instead, hinge forward from your hips and bend your knees when you need to reach down for something low or on the floor. Remember, yoga is a practice of awareness, so whenever you’re preparing to bend over and pick something up, mindfully use these healthy body mechanics:
- Turn your body so your feet face the object. This keeps you from having to twist your spine.
- Bend your knees and hinge forward from your hips—not your waist—sticking your bottom out and keeping length in your spine (avoid rounding your back).
- Pick up the item and bring it in toward your body.
- Use the strength of your legs to stand back up.
Puppy Pose


Many yoga postures are named for animals, who have a great deal to teach us about living well in our bodies—including the important lesson of stretching whenever we get up from a fixed position.
This pose is a variation of the classic yoga posture Downward-Facing Dog, inspired by the canine’s paws-down, tail-up stretch. Puppy Pose offers a similar stretch without requiring you to put your hands on the floor:
- Rest your palms on a wall, countertop, or shelf, shoulder-width apart.
- Walk your feet back and hinge forward from your hips until your arms are fully extended, your torso is parallel to the floor, and your hips are directly over your ankles.
- Inhale deeply, then exhale as you press your palms into the wall and draw your hips back, keeping your neck in line with your spine. Stay here for a few breaths.
- Variation: To add more stretch in the lower legs, step your right foot forward and left foot back while still drawing your hips back evenly. For more intensity, lift the toes and ball of the front foot, keeping the heel on the floor. Stay here for a few breaths, then switch legs.
Nondominant Hand Practice
If you check the soles of an old, favorite pair of shoes, they’re likely to be worn down in a way that reflects your habitual patterns of movement.
Our bodies can also reflect wear patterns. After years of using your muscles in a specific way—often related to using your dominant hand—you may become asymmetrical or lopsided, which can be a setup for injury and pain.
Yoga can remedy this situation, as it’s designed to help balance your body so that all areas—right and left, front and back, top and bottom—have equal or appropriate strength and flexibility.
This practice is designed to help you cultivate strength and coordination on your non-dominant side while also offering relief from any repetitive tension you may experience on your dominant side.
Being mindful to keep the good postural alignment in Mountain Pose or Seated Mountain Pose, use your non-dominant hand to perform various tasks:
- Brushing your teeth or combing your hair
- Performing kitchen chores, such as stirring, mashing potatoes, or washing dishes
- Answering the phone or using the TV remote
- When using both hands for activities such as sweeping or raking, switch the hand that’s on top.
Tightrope Walking
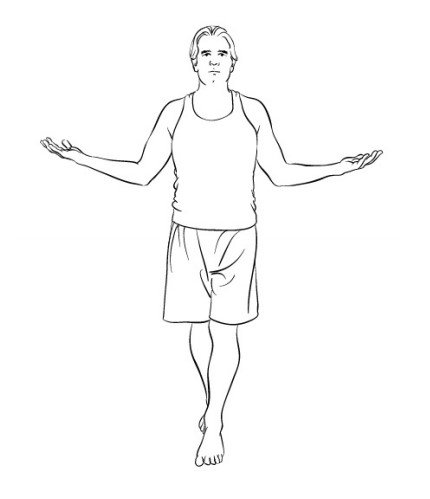

In yoga, we place our bodies in challenging positions and learn how to relax and breathe through difficult poses.
Then, when life places us in challenging positions, we can draw upon this experience to relax and breathe through difficult situations.
Tightrope walking is a prime example of this principle—and also a wonderful metaphor for life—since it’s about learning to keep our balance in challenging circumstances.
You might recall the astonishing high-wire performance of tightrope artist Philippe Petit, who walked between New York’s Twin Towers in 1974, as you play with this pose:
- Stand tall in Mountain Pose (Yoga Spark 2), then bring your left heel directly in front of the toes of your right foot. If this feels unsteady, widen up your stance a bit—more like walking a plank than a tightrope.
- Gaze at a spot at eye level. Extend your arms out to your sides, bend your elbows, and turn your palms up. Alternatively, you can lightly touch a wall or countertop for support if you like.
- Feel your weight evenly distributed on both legs, then shift your weight to your front foot and pick up your back heel. Keeping your breath flowing, take a step forward, placing your right heel in front of the toes of your left foot and redistributing your weight evenly on both legs.
- Continue slowly and mindfully walking forward in this way for a few steps.
- Variation: For more challenge, try walking backward. Stand with your weight evenly distributed on both legs, then shift your weight to your back foot and pick up the ball of your front foot. Keeping your breath flowing, take a step backward and redistribute your weight evenly on both legs. Continue slowly and mindfully walking backward in this way for a few steps.
Palm Tree
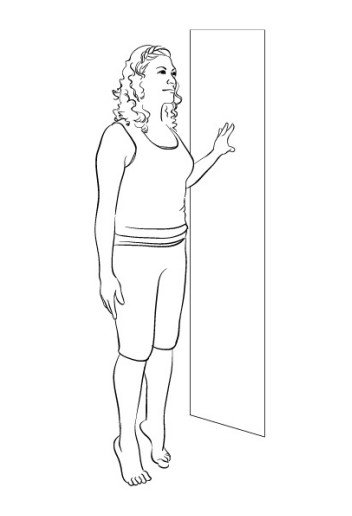

Sometimes called heel raises by physical therapists, this posture helps strengthen your ankles and calves and improve your balance.
Try it in the kitchen, perhaps while waiting for water to boil, in the bathroom while brushing your teeth, or anywhere in your house while on the phone:
- Stand tall, lightly touching a chair back, countertop, or wall for support if you like.
- Focus your gaze on a spot at eye level.
- On an inhalation, slowly lift your heels up as high as they’ll go.
- On an exhalation, bring your heels back to the ground.
- Continue for several breaths, synchronizing your movement with your breath.
- When you’re ready, stay in the heels-up position, keeping your breath flowing.
- Variation: For more challenges, take one or both hands away from the support and balance on the balls of your feet.
Crane Pose


Named for the long-necked bird that mates for life and is considered a symbol of good luck and fidelity, this posture helps strengthen the legs and abdominals while enhancing balance.
- Stand tall in Mountain Pose (Yoga Spark 2) with your palms together in front of your chest.
- Soften your knees and engage your abdominal muscles, drawing your belly in toward your spine.
- Inhale and lift your right knee up, slightly bending your left knee and extending your arms out to your sides.
- Exhale and place your foot back down, returning to Mountain Pose with your palms together at your chest.
- Repeat with the other leg.
- Continue, alternating legs six to ten times, synchronizing your movement with your breath.
- Variation: For extra challenge, stay in the balance position for several breaths.
Legs up the Wall or on a Chair
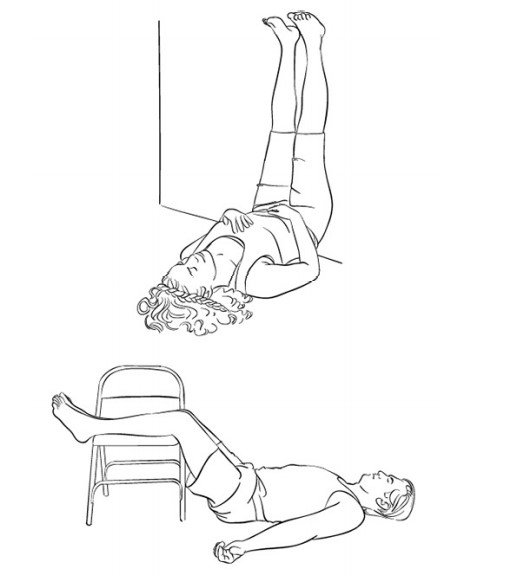

Inverted postures literally turn our world upside down, reversing the effects of gravity on our muscles, bones, and bodily fluids.
Unfortunately, some well-known inverted poses, such as Headstand and Shoulder Stand, are often inadvisable for people who are overweight or have health challenges such as osteoporosis.
However, this simple practise of elevating the legs on a wall or chair can provide many of the welcome “antigravity” effects without the risks for most people. (If you have a serious health condition or are unsure whether this is safe for you, please check with your health care provider.)
A variation of the posture Viparita Karani, a name that translates as “reversed doing,” Legs up the Wall helps calm the nervous system and relieve the fatigue of body and mind.
It’s particularly useful if you’ve been on your feet for hours—for example, working in the kitchen or the yard.
Ideally, it’s nice to rest in this restorative pose for ten, twenty, or even thirty minutes. But even if you have just sixty seconds, it’s worth taking a load off and elevating your legs.
To practice at a wall: Sit on the floor about one hand’s width away from the wall with your legs parallel to the wall.
Swing your legs up on the wall as you ease your back onto the floor. Adjust the distance between your bottom and the wall so that you feel comfortable.
Some people like to have their sit bones almost pressed to the wall, while others like their bottom to be six to twelve inches away.
To practice with a chair: Lie on the floor and rest your lower legs on a chair. It’s fine to cushion your calves with a blanket or towel if that’s more comfortable.
In either variation, adjust your arm position for comfort, relaxing them out at your sides or placing your palms on your belly or chest.
If you like, place an eye pillow over your eyes. Set a timer so that you can relax completely. Turn your attention to your breath, inviting it to slow and deepen.
As best you can, release any distracting thoughts and invite yourself to surrender completely into the support of the floor and wall or chair.
Conclusion
I hope this article helps you to improve your posture. Practice these poses daily for good posture. In our ever-more-complex world, going to the gym or out for a run is easily sidelined.
Going to church or even finding meaningful time with friends is a challenging accomplishment. But everyone, everywhere, can find a minute.
And as every practice in this article illustrates, in taking a minute to find yourself, you can find yourself literally and spiritually at the moment—practice and a process that can transform even the most maddening and mundane corners of life itself.
Also Read:


